§ 本文目标
通过学习章节,将掌握基于Spring Transaction注解的事务开发,在开发原子级微服务时对查询类、提交类的事务控制、异常回滚
文章最后,简单讲解常用的批量操作方式
基于Spring Boot2.0.5 基础讲解
§ 练习场景
实现客户状态的查询、单个修改、批量修改,单个修改支持异常回滚,批量操作支持批量提交和回滚
前提
基于3.2.1 微服务工程创建章节,练习该场景模型设计
-- Create table
	create table EXAMPLE_DEMO
	(
	  logic_seq      VARCHAR2(100) not null,
	  current_action VARCHAR2(100),
	  cust_id        VARCHAR2(32),
	  cust_name      VARCHAR2(32),
	  instance_id    VARCHAR2(100),
	  node_id        VARCHAR2(32),
	  node_user      VARCHAR2(32),
	  ggg            NUMBER(16,3),
	  gg             NUMBER(2)
	);
	-- Add comments to the columns
	comment on column EXAMPLE_DEMO.logic_seq   is '主键';
	comment on column EXAMPLE_DEMO.current_action  is '资源码';
	comment on column EXAMPLE_DEMO.cust_id   is '用户码';
	comment on column EXAMPLE_DEMO.cust_name   is '用户名称';
	comment on column EXAMPLE_DEMO.instance_id   is '实例码';
	comment on column EXAMPLE_DEMO.node_id   is '节点码';
	comment on column EXAMPLE_DEMO.node_user   is '节点名称';
	comment on column EXAMPLE_DEMO.ggg   is '小数';
	comment on column EXAMPLE_DEMO.gg   is '整数';
2
3
4
5
6
7
8
9
10
11
12
13
14
15
16
17
18
19
20
21
22
23
§ 操作步骤
§ 代码自动构建
完成表EXAMPLE_DEMO数据库初始化后,通过代码自动构建,完成基础代码创建
§ 创建ExampleDemoList对象
package cn.com.yusys.yusp.domain;
import java.io.Serializable;
import java.util.List;
/**
 * 样例表列表.
 *
 * @since 2.1.1
 *
 */
public class ExampleDemoList implements Serializable{
          private static final long serialVersionUID = 1L;

          private List<ExampleDemo> exampleList;
          public List<ExampleDemo> getExampleList() {
                    return exampleList;
          }
          public void setExampleList(List<ExampleDemo> exampleList) {
                    this.exampleList = exampleList;
          }
}
2
3
4
5
6
7
8
9
10
11
12
13
14
15
16
17
18
19
20
§ 业务层开发
@Transactional 方法方法名上,只对这个方法有作用,同样必须是public的方法,事务的传递性可以查看本章内注解属性说明
§ 只读事务
查询类业务操作,如果仅仅是Service中一个独立的查询,为了提高访问效率,提升数据库资源利用率,可以设置为只读事务
* 但是需要注意,开启只读事务中,如果发起提交类操作,会产生异常
@Service
public class ExampleDemoService extends CommonService {

          private static final Logger logger = LoggerFactory.getLogger(ExampleDemoService.class);

    @Autowired
    private ExampleDemoMapper exampleDemoMapper;
    @Override
    protected CommonMapper<?> getMapper() {
        return exampleDemoMapper;
    }
    @Autowired
    private SqlSessionTemplate sqlSessionTemplate;

    /**
     * 只读事务.
    * <p>
     * 查询类业务操作,如果仅仅是Service中一个独立的查询,为了提高访问效率,提升数据库资源利用率,可以设置为只读事务;
     * 但是需要注意,开启只读事务中,如果发起提交类操作,会产生异常。
     * @param model
     * @return
     */
    @Transactional(readOnly = true)
    public List<ExampleDemo> query(QueryModel model) {
          //设置分页信息
       PageHelper.startPage(model.getPage(), model.getSize());
        List<ExampleDemo> exampleList = exampleDemoMapper.selectByModel(model);

        //线程变量清理
        PageHelper.clearPage();
       return exampleList;
    }
}
2
3
4
5
6
7
8
9
10
11
12
13
14
15
16
17
18
19
20
21
22
23
24
25
26
27
28
29
30
31
32
33
§ 事务异常控制
rollbackFor 该属性用于设置需要进行回滚的异常类数组,当方法中抛出指定异常数组中的异常时,则进行事务回滚。如果不指定该参数,默认只针对RuntimeException回滚
 @Transactional(readOnly = false, rollbackFor = { Exception.class, RuntimeException.class })
    public void updateStatus(ExampleDemo exampleDemo) {
          exampleDemoMapper.updateByPrimaryKey(exampleDemo);
    }
2
3
4
§ 批量数据提交
Mybatis 的ExcutorType支持三种方式:
- ExecutorType.SIMPLE 为每个语句创建一个PreparedStatement,默认模式
- ExecutorType.REUSE 重复使用PreparedStatements
- ExecutorType.BATCH 重复使用PreparedStatements,并批量更新,期间不运行select操作
@Transactional(readOnly = false, rollbackFor = { Exception.class, RuntimeException.class })
    public void batchUpdate(List<ExampleDemo> exampleDemoList) {

          // 步骤1 获取线程批量session
        SqlSession session = sqlSessionTemplate.getSqlSessionFactory().openSession(ExecutorType.BATCH, false);

        // 步骤2 获取mapper
        ExampleDemoMapper exampleDemoMapper = session.getMapper(ExampleDemoMapper.class);

        // 注意,事务内不允许做查询操作,否则无法做事务回滚,因为查询操作会执行flushStatements
        try {

            exampleDemoList.forEach(demo -> {
                exampleDemoMapper.insert(demo);
            });

            // 步骤3 推送更新
            session.flushStatements();
        } catch (Exception e) {
            logger.error("逻辑系统初始化失败,错误信息:{}", e.getMessage());
            throw e;
        }
    }
2
3
4
5
6
7
8
9
10
11
12
13
14
15
16
17
18
19
20
21
22
23
§ Rest新增接口
 /**
     * 列表查询
     * @param model
     * @return
     */
   @GetMapping(value = "/idex")
    public ResultDto<List<ExampleDemo>> query(QueryModel model) {
        List<ExampleDemo> demoList = exampleDemoService.query(model);
        return new ResultDto<List<ExampleDemo>>(demoList);
    }

    /**
     * 修改信息
     * @param model
     * @return
     */
    @SuppressWarnings({ "rawtypes"})
    @PostMapping(value = "/updatestatus")
    public ResultDto updateExamplStatus(@RequestBody ExampleDemo exampleDemo) {
          exampleDemoService.updateStatus(exampleDemo);
        return new ResultDto();
    }

    /**
     * 批量修改
     * @param model
     * @return
     */
    @SuppressWarnings({ "rawtypes"})
    @PostMapping(value = "/batchupdate")
    public ResultDto batchUpdate(@RequestBody ExampleDemoList exampleDemoList) {
          exampleDemoService.batchUpdate(exampleDemoList.getExampleList());
        return new ResultDto();
    }
2
3
4
5
6
7
8
9
10
11
12
13
14
15
16
17
18
19
20
21
22
23
24
25
26
27
28
29
30
31
32
33
34
§ 事务配置
首先,在启动类增加注解 @EnableTransactionManagement 开启事务,同时增加MapperScan路径扫描配置
@SpringBootApplication(scanBasePackages = "cn.com.yusys.yusp", exclude = {SecurityAutoConfiguration.class, JasyptSpringBootAutoConfiguration.class})
@MapperScan("cn.com.yusys.yusp.**.repository.mapper")
@EnableTransactionManagement
ublic class ExampleApp {
    public static void main(String[] args) {
        SpringApplication.run(ExampleApp.class, args);
    }
}
2
3
4
5
6
7
8
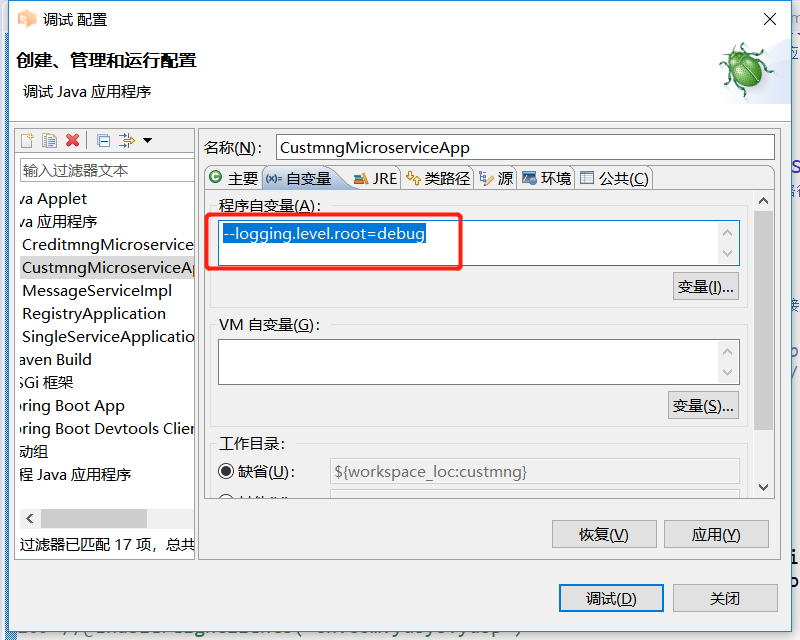
§ debug日志级别启动
开启debug日志,可以查看后台SQL的执行详情
方式一
应用开发--服务启动--CustmngMicroserviceApp--右键–调试方式–调试配置
在自变量输入:–logging.level.root=debug
启动方式二
直接修改bootstrap.yml配置

§ swagger发起接口测试
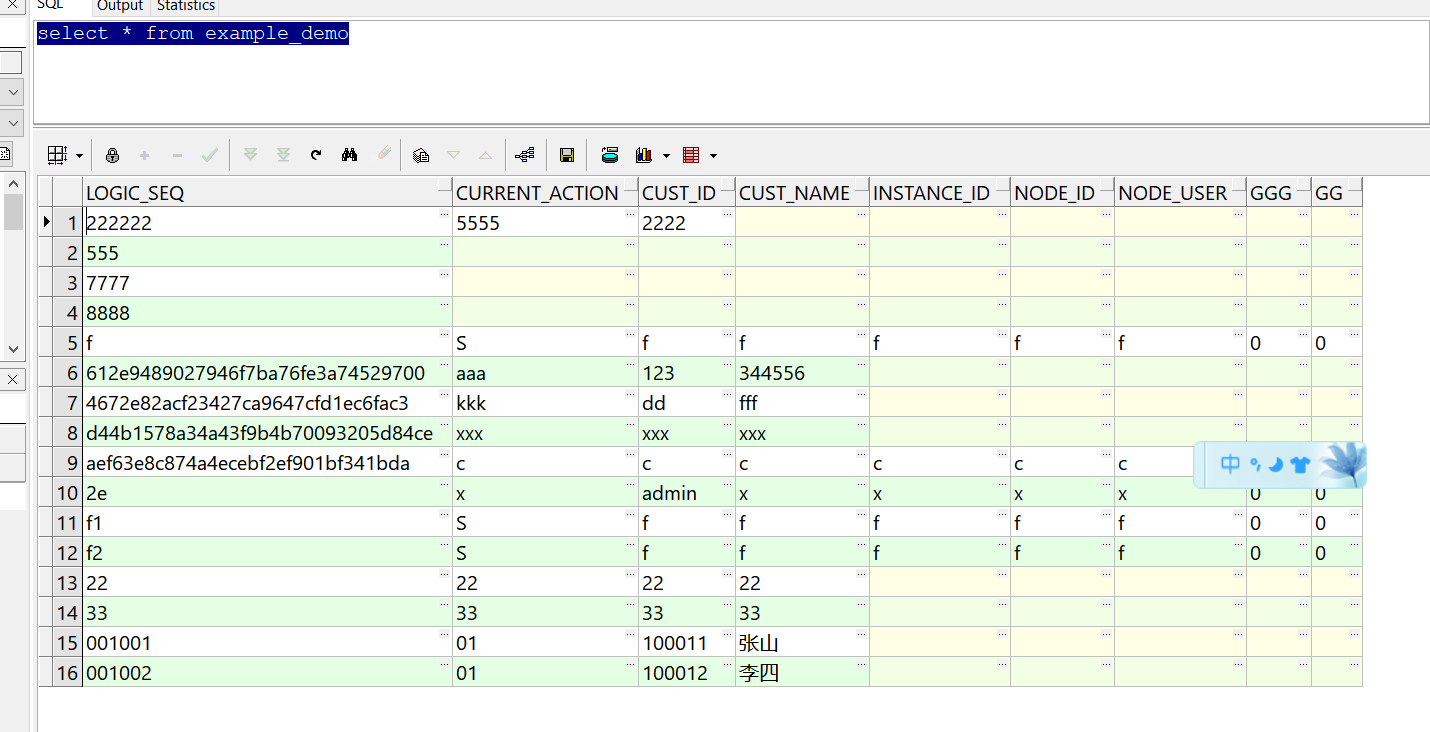
为数据表创建10条左右的测试数据
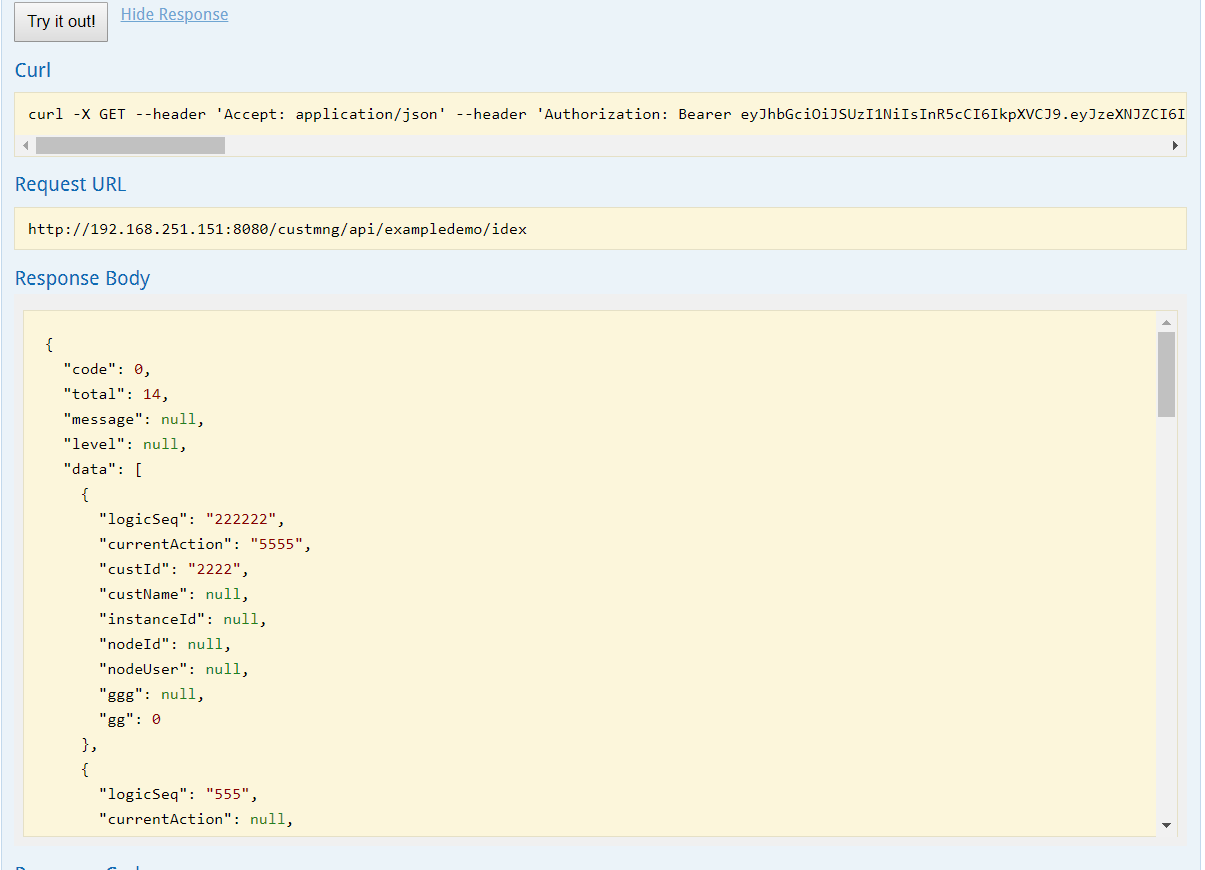
§ 列表查询
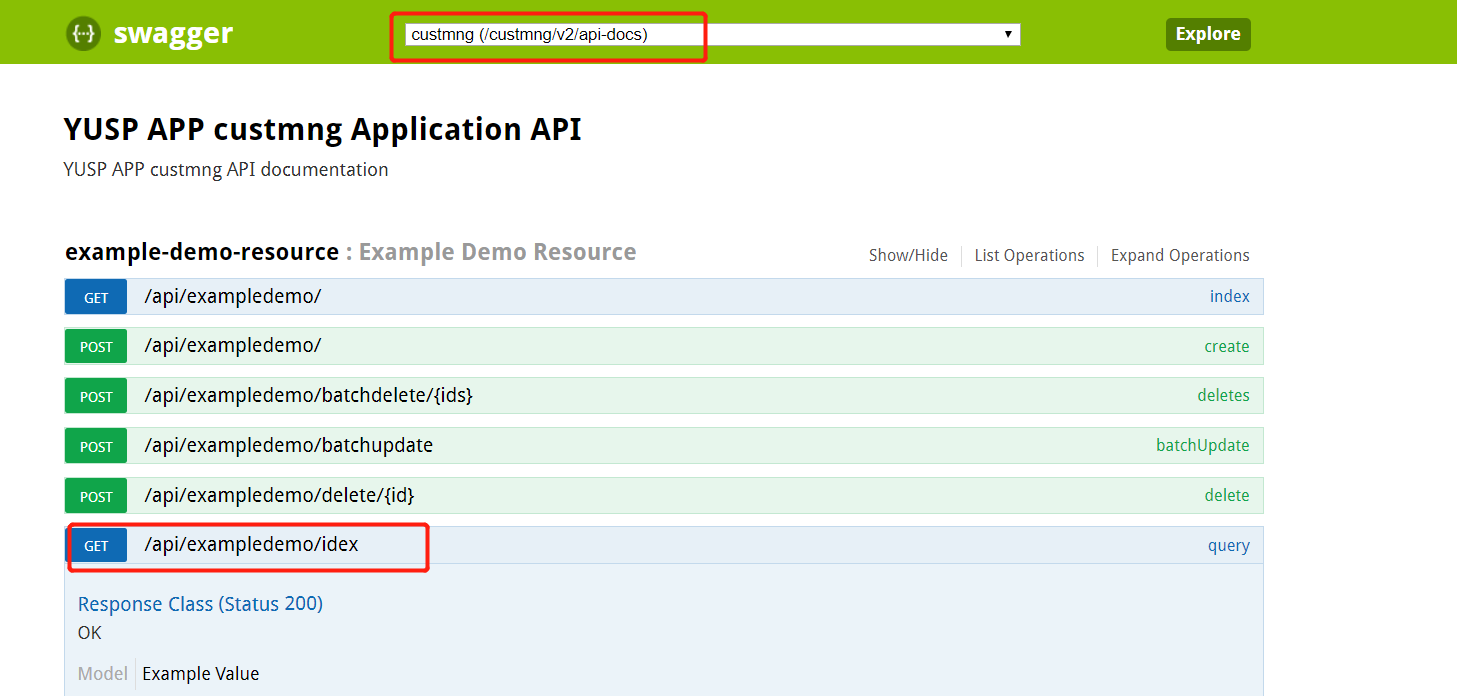
查询结果
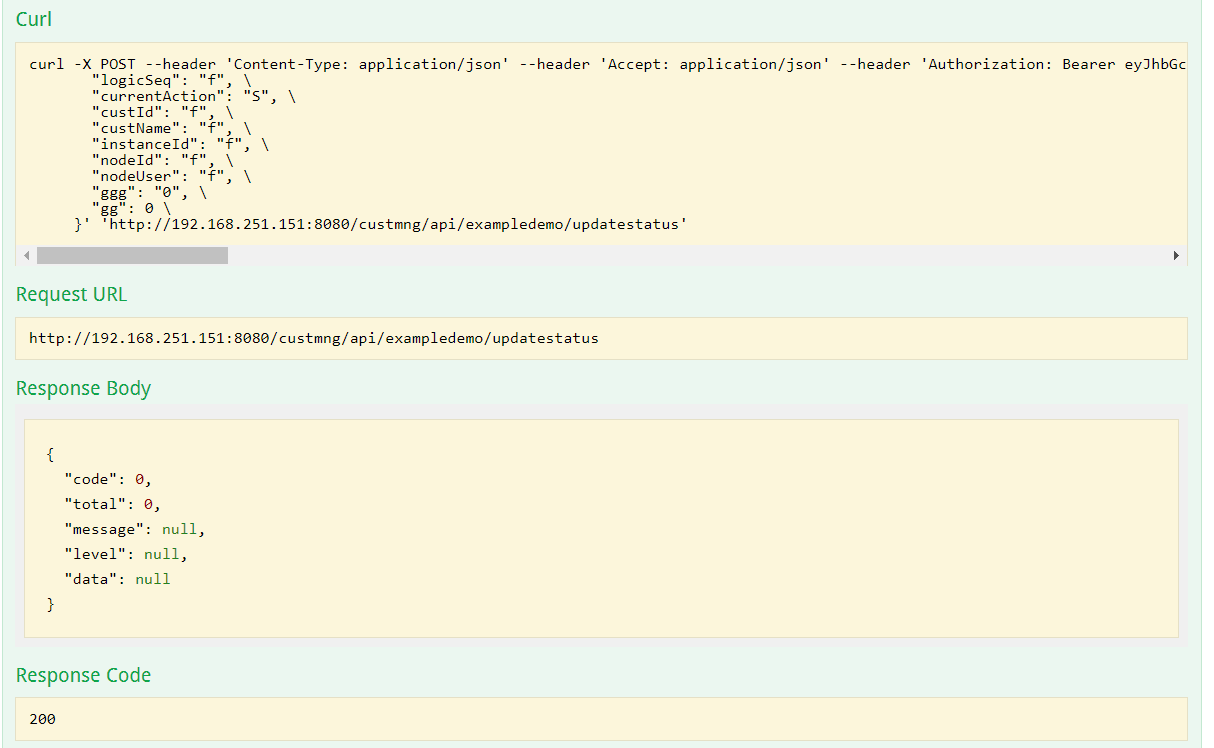
§ 状态修改
{
"logicSeq": "f",
"currentAction": "S",
"custId": "f",
"custName": "f",
"instanceId": "f",
"nodeId": "f",
"nodeUser": "f",
"ggg": "0",
"gg": 0
}
2
3
4
5
6
7
8
9
10
11
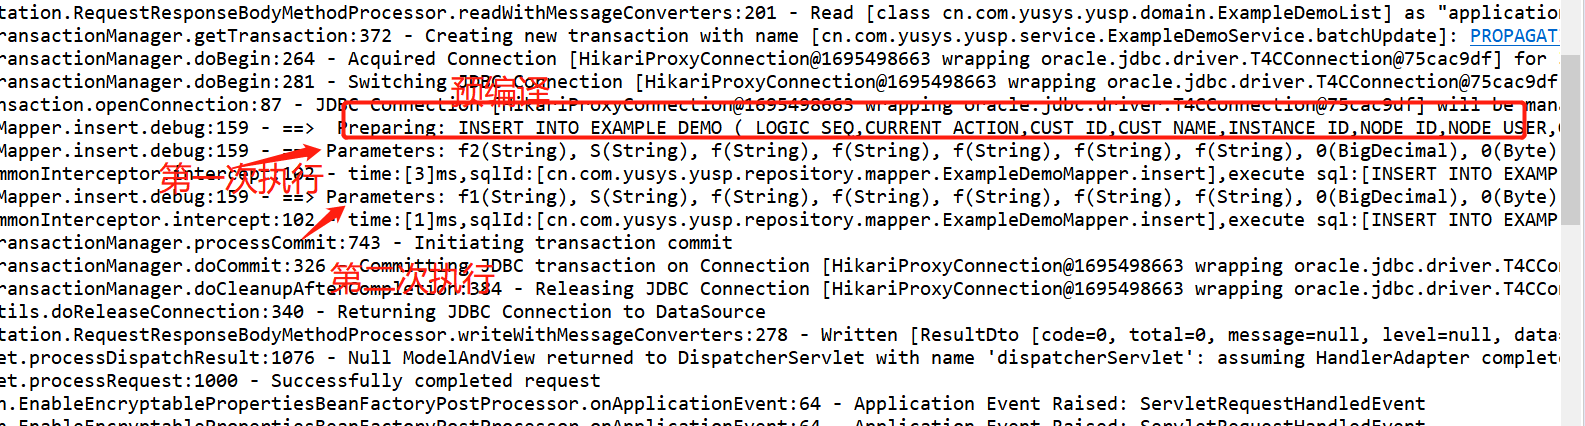
后台SQL执行日志
§ 批量操作,数据都合法,全部入库
{
"exampleList": [

{
"logicSeq": "f1",
"currentAction": "S",
"custId": "f",
"custName": "f",
"instanceId": "f",
"nodeId": "f",
"nodeUser": "f",
"ggg": "0",
"gg": 0
},
{
"logicSeq": "f2",
"currentAction": "S",
"custId": "f",
"custName": "f",
"instanceId": "f",
"nodeId": "f",
"nodeUser": "f",
"ggg": "0",
"gg": 0
}
]
}
2
3
4
5
6
7
8
9
10
11
12
13
14
15
16
17
18
19
20
21
22
23
24
25
26
27
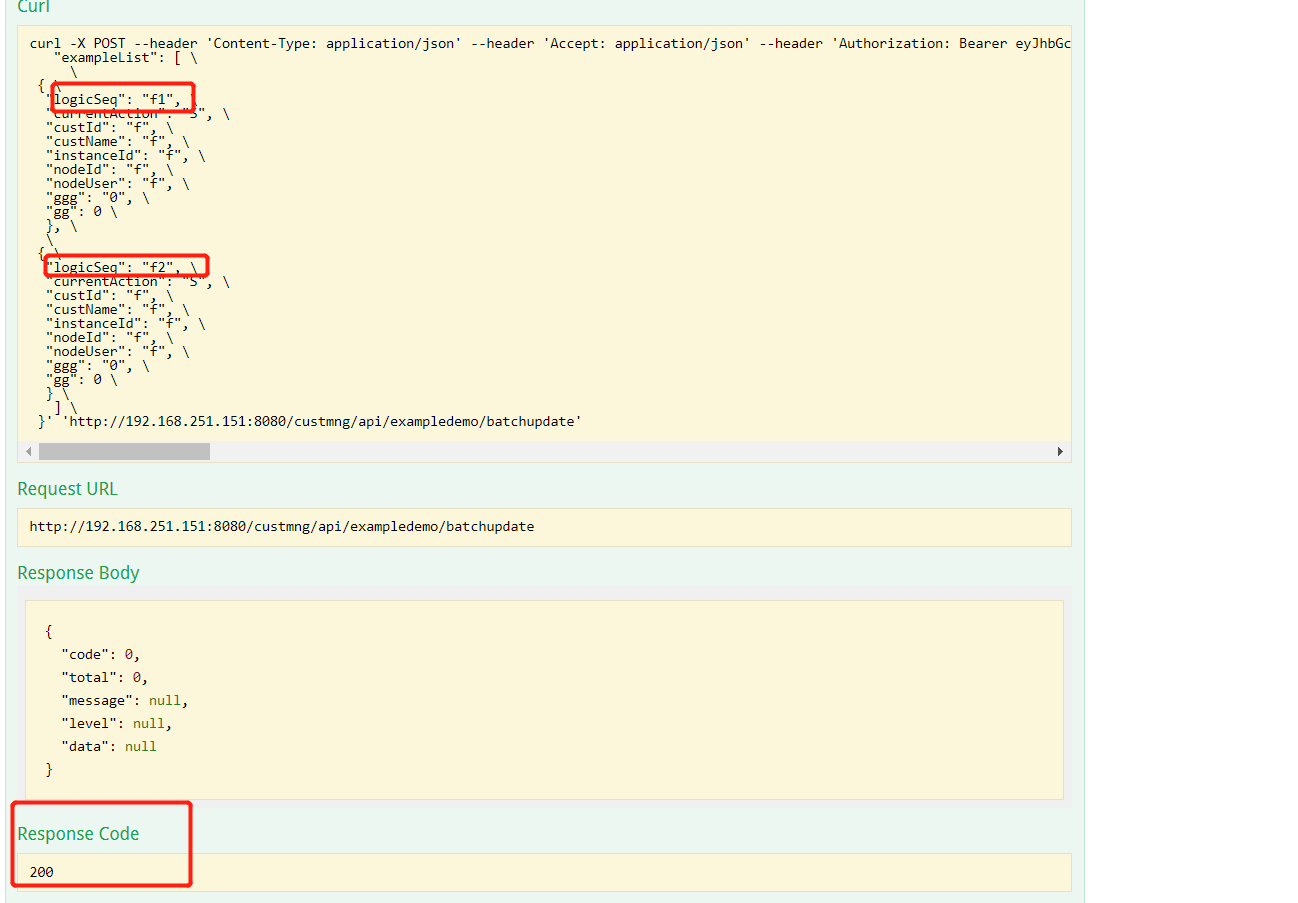
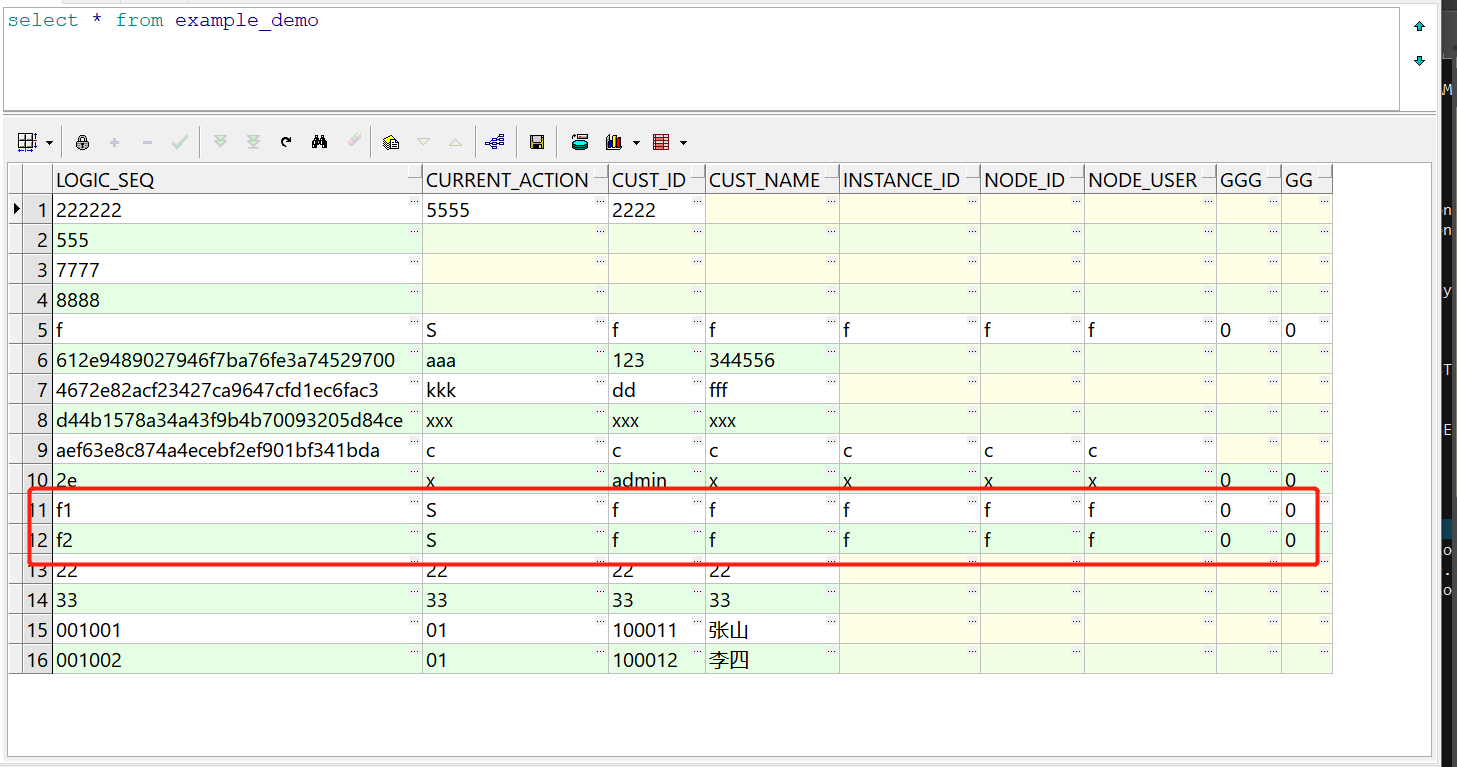
后台SQl执行,成功提供
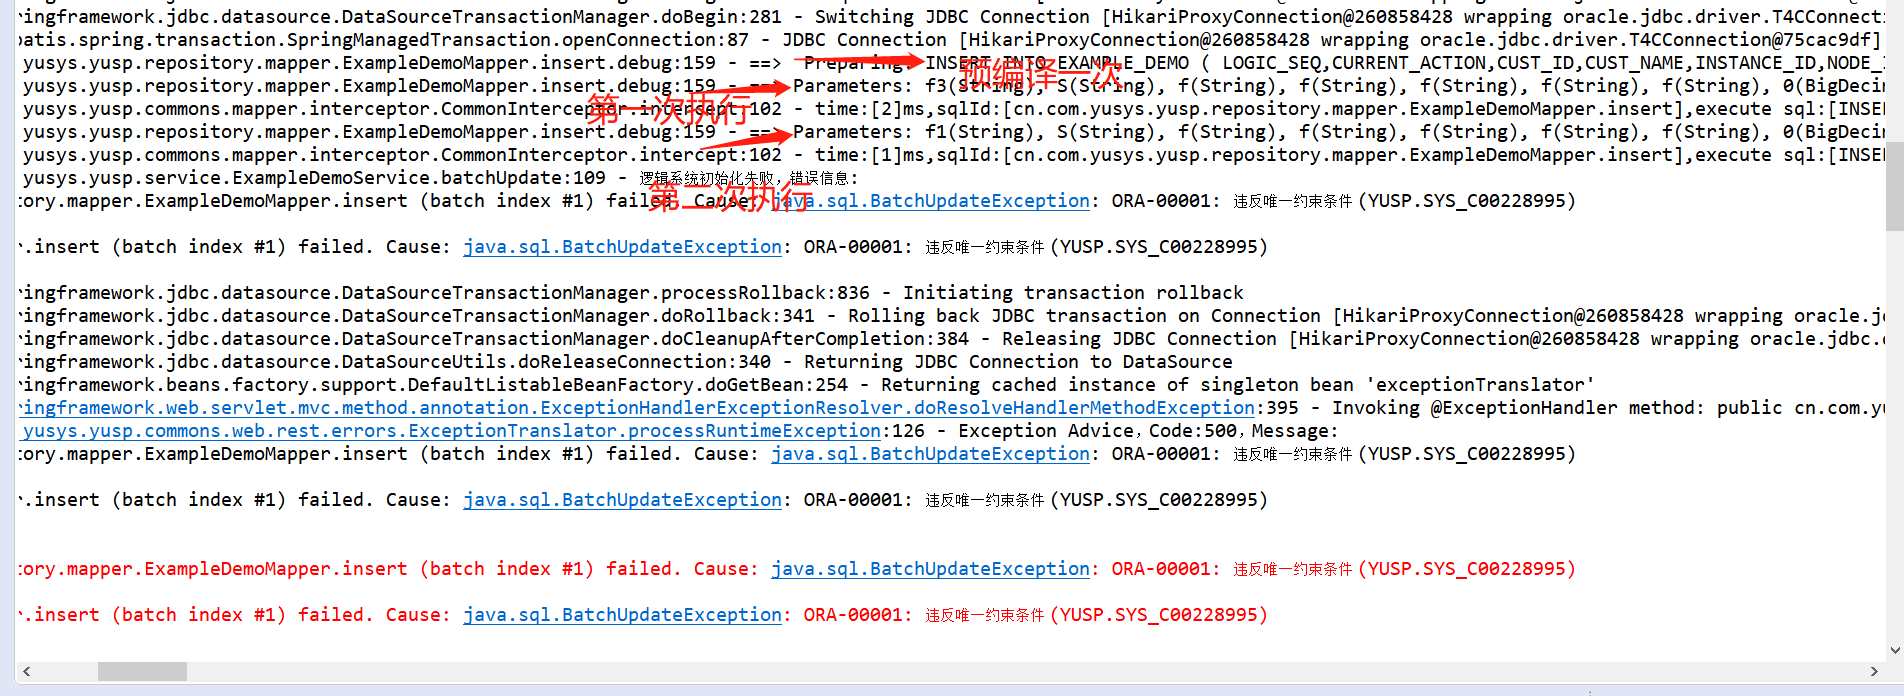
§ 批量操作,数据存在不合法,全部回滚
继续使用上面的报文,修改logicSeq 第二个节点f2 为f3,但第一个节点logicSeq还是保持f1
{
"exampleList": [

{
"logicSeq": "f1",
"currentAction": "S",
"custId": "f",
"custName": "f",
"instanceId": "f",
"nodeId": "f",
"nodeUser": "f",
"ggg": "0",
"gg": 0
},
{
"logicSeq": "f3",
"currentAction": "S",
"custId": "f",
"custName": "f",
"instanceId": "f",
"nodeId": "f",
"nodeUser": "f",
"ggg": "0",
"gg": 0
}
]
}
2
3
4
5
6
7
8
9
10
11
12
13
14
15
16
17
18
19
20
21
22
23
24
25
26
27
系统报错500

数据未成功入库
后台日志,第一条成功,第二条失败,全部回滚
§ 扩展知识
§ 注解属性说明
| 属性 | 类型 | 描述 |
|---|---|---|
| value | String | 可选的限定描述符,指定使用的事务管理器 |
| propagation | enum: Propagation | 可选的事务传播行为设置 |
| isolation | enum: Isolation | 可选的事务隔离级别设置 |
| readOnly | boolean | 读写或只读事务,默认读写 |
| timeout | int (in seconds granularity) | 事务超时时间设置 |
| rollbackFor | Class对象数组,必须继承自Throwable | 导致事务回滚的异常类数组 |
| rollbackForClassName | 类名数组,必须继承自Throwable | 导致事务回滚的异常类名字数组 |
| noRollbackFor | Class对象数组,必须继承自Throwable | 不会导致事务回滚的异常类数组 |
| noRollbackForClassName | 类名数组,必须继承自Throwable | 不会导致事务回滚的异常类名字数组 |
propagation 事务的传播行为,默认值为 Propagation.REQUIRED
- Propagation.REQUIRED 如果当前存在事务,则加入该事务,如果当前不存在事务,则创建一个新的事务
- Propagation.SUPPORTS 如果当前存在事务,则加入该事务;如果当前不存在事务,则以非事务的方式继续运行
- Propagation.MANDATORY 如果当前存在事务,则加入该事务;如果当前不存在事务,则抛出异常
- Propagation.REQUIRES_NEW 重新创建一个新的事务,如果当前存在事务,暂停当前的事务
- Propagation.NOT_SUPPORTED 以非事务的方式运行,如果当前存在事务,暂停当前的事务
- Propagation.NEVER 以非事务的方式运行,如果当前存在事务,则抛出异常
- Propagation.NESTED 和 Propagation.REQUIRED 效果一样
isolation 属性事务的隔离级别,默认值为 Isolation.DEFAULT
- Isolation.DEFAULT 使用底层数据库的默认隔离级别
- Isolation.READ_UNCOMMITTED 该隔离级别表示一个事务可以读取另一个事务修改但还没有提交的数据。该级别不能防止脏读,不可重复读和幻读,因此很少使用该隔离级别
- Isolation.READ_COMMITTED 该隔离级别表示一个事务只能读取另一个事务已经提交的数据
- Isolation.REPEATABLE_READ 该隔离级别表示一个事务在整个过程中可以多次重复执行某个查询,并且每次返回的记录都相同
- Isolation.SERIALIZABLE 所有的事务依次逐个执行,这样事务之间就完全不可能产生干扰,也就是说,该级别可以防止脏读、不可重复读以及幻读
§ 常见批量操作
§ 普通for循环插入
少量数据,100内,推荐使用
@Transactional(readOnly = false, rollbackFor = { Exception.class, RuntimeException.class })
    public void batchUpdateExamp2(List<ExampleDemo> exampleDemoList) {
        for (ExampleDemo eampleDemo: exampleDemoList) {
            mapper.insert(eampleDemo);
        }
    }
2
3
4
5
6
§ BATCH模式插入
本文 批量数据提交 节
§ foreach方式插入
<insert id="insertBatch">
                    INSERT INTO EXAMPLE_DEMO
                    (LOGIC_SEQ, CURRENT_ACTION, CUST_ID, CUST_NAME)
                    VALUES
                    <foreach collection="list" item="demo" separator=",">
                               (#{demo.logicSeq}, #{demo.currentAction}, #{demo.custId},
                               #{demo.custName})
                    </foreach>
</insert>
2
3
4
5
6
7
8
9